The recipe is pretty simple and takes a few minutes of prep time and less than 20 minutes to make once you start cooking in the air fryer.
Ingredients:
- Half a bag of your favorite Freezer Ravioli brand
- 1 Tbs Italian herbs
- 1 Tbs Olive Oil
- 1/2 oz. shredded Parmesan cheese
- 1/4 cup of marinara sauce
We start off by thawing out our frozen ravioli's, we recommend pulling the bag about 1-2hrs before planning to cook to let the ravioli's thaw out. The more thawed out they are the easier it will be for us to get that perfect crispy golden brown finish that tastes as delicious as it looks. With that out of the way about 5 minutes prior to cooking we like to pre-heat our air fryer to 400 deg and let it run empty for about 5 minutes to make sure the basket and crisper tray are nice and hot. This step is not necessary but we like to make sure our cooking basket is hot which reduce's overall cook time and helps bring the crispiness to the next level.
While your air fryer is warming up, this is the time to take your thawed ravioli's and place them in a deep mixing bowl. Add the olive oil and mix in the Italian herbs. Give it a good couple of tosses to make sure the ravioli's are well coated with oil and herbs. You are looking for a nice even coating of herbs on both sides of the ravioli.
At this point your ravioli's are coated and your air fryer is nice and warm. Now its time to place the ravioli's in your air fryer basket. Make sure that you have your crisper tray at the bottom of your air fryer basket, this is essential to ensure air flow all around the raviolis as they are cooking especially if you want them to be crispy.
Place your air fryer basket back in the Air fryer and set it to 400 deg. and cook for 20 min. at the 7 min mark, pull the basket out and give it a nice shake to shake up the ravioli's to make sure they are cooking evenly on both sides. Do that again at the 14 minute.
Once the ravioli's have cooked for 20 minutes they should be nice and crispy, if they are not crispy enough for you, feel free to taste one (use a fork, dont burn your fingers), you can put it back in for an additional 5 minutes at 400 deg.
Place the ravioli's on a plate and sprinkle your Parmesan cheese on top, the ravioli's should be hot enough to melt the cheese a little bit and allow it to stick to them. Serve with marinara as dipping sauce and enjoy!
We hope you enjoyed this awesome recipe, if you think we could improve on it, or if you have a better recipe all together or any comments or questions feel free to leave us a message below in the comments and we will do our best to answer each and every comment.
Look no further than the Uber Appliance line of Air Fryers, from the Air Fryer XL 5 Quart to its little brother the Air Fryer 3.7 Quart, the Uber Appliance Air Fryers are high quality built and long lasting.
our Uber Air Fryer XL is perfect for any family with its roomy 5 quart basket you can air fry a whole chicken. The dishwasher safe basket and grease separator with non-stick coating make cleaning a breeze just wipe it down with a damp soapy microfiber towel and toss it in the dishwasher.
The Uber Air Fryer XL features an easy to use touch display for temperature and time setting with temperatures ranging from 140F to 400F, at 140F it is great for dehydrating your favorite snacks and foods. the digital display also has several pre-set cooking temperatures and time to perfectly cook chicken, steak, fries, wings and so much more with a single press of a button. Every Uber Air Fryer XL Comes with a free recipe book so that you can explore tasty meals as soon as you get it with plenty more recipes on our site.
The Uber AirFryer XL’s plastic is prevented from the factory which eliminates any plastic smell or taste in your foods from the first use. This is one of the biggest complaints from air fryer users and at Uber Appliance we listen to our customer’s feedback and strive to provide the best experience from the first use!
]]>Ingredients:
We start off by preheating our air fryer as usual, we set it to 400 deg for 5 minutes. While the air fryer is heating up we take our flat bread and add the pizza sauce to it, add the mozzarella cheese and top it off with pepperoni. You can switch up the toppings to whatever you like, you can make a Hawaiian style pizza with Canadian bacon and pineapples, you can make a veggie pizza with bell peppers, mushrooms and olives, really your imagination is the limit at this point.
Place you pizza in the air fryer and cook for 10 minutes at 300 deg. If you want an extra crispy bottom crust we recommend you place your pizza directly on top of the crisper tray to allow the hot air to flow around the bottom of the fridge. once your pizza finishes its cooking time remove, cut it up and enjoy!
We hope you enjoyed this awesome recipe, if you think we could improve on it, or if you have a better recipe all together or any comments or questions feel free to leave us a message below in the comments and we will do our best to answer each and every comment.
Look no further than the Uber Appliance line of Air Fryers, from the Air Fryer XL 5 Quart to its little brother the Air Fryer 3.7 Quart, the Uber Appliance Air Fryers are high quality built and long lasting.
our Uber Air Fryer XL is perfect for any family with its roomy 5 quart basket you can air fry a whole chicken. The dishwasher safe basket and grease separator with non-stick coating make cleaning a breeze just wipe it down with a damp soapy microfiber towel and toss it in the dishwasher.
The Uber Air Fryer XL features an easy to use touch display for temperature and time setting with temperatures ranging from 140F to 400F, at 140F it is great for dehydrating your favorite snacks and foods. the digital display also has several pre-set cooking temperatures and time to perfectly cook chicken, steak, fries, wings and so much more with a single press of a button. Every Uber Air Fryer XL Comes with a free recipe book so that you can explore tasty meals as soon as you get it with plenty more recipes on our site.
The Uber AirFryer XL’s plastic is prevented from the factory which eliminates any plastic smell or taste in your foods from the first use. This is one of the biggest complaints from air fryer users and at Uber Appliance we listen to our customer’s feedback and strive to provide the best experience from the first use!
]]>Ingredients:
We started off as usual with pre-heating our air fryer at 400 deg for 5 minutes, while the air fryer was warming up we take the time to pop open the cinnamon roll can. Remove the cinnamon rolls and separate them in a plate and remove the tub of icing in the bottom of the can.
Once pre-heated carefully place the cinnamon rolls in your air fryer, be sure to use the crisper tray so that the hot air fully encapsulates the cinnamon rolls and cooks them evenly. Be careful when placing the cinnamon rolls in the heated basket, we recommend using heat resistant gloves for this step. Once all cinnamon rolls have been placed in the basket cook at 350 deg for 15 minutes. If you like a moist soft inside we recommend cooking for less time.
Once the cinnamon rolls have been fully cooked, remove, place on a plate and apply the icing while the cinnamon rolls are hot. The hot cinnamon rolls will allow the icing to melt and fully coat them. From here enjoy the delicious easy to make air fryer cinnamon rolls!
We hope you enjoyed this awesome recipe, if you think we could improve on it, or if you have a better recipe all together or any comments or questions feel free to leave us a message below in the comments and we will do our best to answer each and every comment.
Look no further than the Uber Appliance line of Air Fryers, from the Air Fryer XL 5 Quart to its little brother the Air Fryer 3.7 Quart, the Uber Appliance Air Fryers are high quality built and long lasting.
our Uber Air Fryer XL is perfect for any family with its roomy 5 quart basket you can air fry a whole chicken. The dishwasher safe basket and grease separator with non-stick coating make cleaning a breeze just wipe it down with a damp soapy microfiber towel and toss it in the dishwasher.
The Uber Air Fryer XL features an easy to use touch display for temperature and time setting with temperatures ranging from 140F to 400F, at 140F it is great for dehydrating your favorite snacks and foods. the digital display also has several pre-set cooking temperatures and time to perfectly cook chicken, steak, fries, wings and so much more with a single press of a button. Every Uber Air Fryer XL Comes with a free recipe book so that you can explore tasty meals as soon as you get it with plenty more recipes on our site.
The Uber AirFryer XL’s plastic is prevented from the factory which eliminates any plastic smell or taste in your foods from the first use. This is one of the biggest complaints from air fryer users and at Uber Appliance we listen to our customer’s feedback and strive to provide the best experience from the first use!
]]>Ingredients:
Optional Side Dish:
We start off by thawing out the Tilapia fish, we recommend leaving your frozen tilapia filets in the fridge and allowing it to thaw out for 12 hours in the fridge. The CDC does not recommend thawing meats and fish out in room temperature to avoid it from spoiling and causing food poisoning. Take your thawed Tilapia filets and place them in a seasoning pan, add olive oil to each filet. We recommend coating both sides of your tilapia with oil so that the seasoning adheres better to it. Add your seasoning to both sides of the filets and allow them to marinate for 30 minutes in the fridge. While the Tilapia is marinating we recommend pre-heating your air fryer at 400 deg for 5 minutes before you are ready to place your tilapia in the basket.
While your Tilapia is marinating its the perfect time to cook up your mixed vegetable side dish. Set your burner to medium high temperature, place your medium sized pan on the burner and add the salted butter. Once the butter has melted add your frozen vegetables, add seasoning to taste, we recommend salt and pepper. Mix up your seasoning with the vegetables then lower the temperature to medium, cover the pan while stirring occasionally to prevent the vegetables from sticking to the bottom of the pan. It should take 15-20 minutes for the frozen vegetables to fully cook. once cooked remove from the stove and allow to cool for a few minutes before serving.
After the Tilapia has marinated for 30 minutes, place the tilapia filets in your air fryer. Make sure the crisper tray is in the pan prior to adding the filets, this allows the hot air to fully surround your tilapia filets while cooking in the air fryer. set the temperature to 350deg and cook for 13 minutes. At the 7 minute mark we recommend flipping over the Tilapia filets. Once fully cooked allow a few minutes for the basket to cool before serving on a plate.
Once all has been cooked, serve up on a plate with a half lime and enjoy! a quick and easy delicious low calorie meal for you and your family to enjoy together!
We hope you enjoyed this awesome recipe, if you think we could improve on it, or if you have a better recipe all together or any comments or questions feel free to leave us a message below in the comments and we will do our best to answer each and every comment.
Look no further than the Uber Appliance line of Air Fryers, from the Air Fryer XL 5 Quart to its little brother the Air Fryer 3.7 Quart, the Uber Appliance Air Fryers are high quality built and long lasting.
our Uber Air Fryer XL is perfect for any family with its roomy 5 quart basket you can air fry a whole chicken. The dishwasher safe basket and grease separator with non-stick coating make cleaning a breeze just wipe it down with a damp soapy microfiber towel and toss it in the dishwasher.
The Uber Air Fryer XL features an easy to use touch display for temperature and time setting with temperatures ranging from 140F to 400F, at 140F it is great for dehydrating your favorite snacks and foods. the digital display also has several pre-set cooking temperatures and time to perfectly cook chicken, steak, fries, wings and so much more with a single press of a button. Every Uber Air Fryer XL Comes with a free recipe book so that you can explore tasty meals as soon as you get it with plenty more recipes on our site.
The Uber AirFryer XL’s plastic is prevented from the factory which eliminates any plastic smell or taste in your foods from the first use. This is one of the biggest complaints from air fryer users and at Uber Appliance we listen to our customer’s feedback and strive to provide the best experience from the first use!
]]>Ingredients:
We start off by prepping our air fryer, first off you want to make sure your air fryer has been thoroughly cleaned from the last time you used it, see our air fryer cleaning guide here for more details. We like to pre-heat our air fryer so that its nice and ready for cooking. We preheat our air fryer by setting the temperature to 400 deg and let the basket warm up for 5 minutes. After pre-heating the basket, remove it and carefully place your bacon inside the basket. Set the air fryer to 300 deg and let it cook for 6 minutes. At the 3 minute mark flip the bacon over and let it cook for another 3 minutes. You can cook for longer or less depending on how crispy you like your bacon. Once the bacon has cooked remove with tongs and place on a plate with paper towels to absorb any excess bacon grease.
While the bacon is sizzling in the air fryer you can place your toast in the toaster for a few minutes. We take this time to also prep our lettuce and tomato. We take our Romaine lettuce leaf and slice it in half. We also take our half tomato and slice it into thin slices to put on our sandwich.
We take our sourdough toast and add a little butter on both slices, add a little mayo on the top and bottom slice. We place our lettuce on the top and bottom slices, then we add our tomato and bacon slices. We put the sandwich all together et voila! an air fryed BLT Sandwich. We decided to fry up some crinkle cut fries in our air fryer as well as a nice little side dish. This sandwich is really delicious and easy to make in a pinch. A great little meal that you and your family will enjoy.
We hope you enjoyed this awesome recipe, if you think we could improve on it, or if you have a better recipe all together or any comments or questions feel free to leave us a message below in the comments and we will do our best to answer each and every comment.
Look no further than the Uber Appliance line of Air Fryers, from the Air Fryer XL 5 Quart to its little brother the Air Fryer 3.7 Quart, the Uber Appliance Air Fryers are high quality built and long lasting.
our Uber Air Fryer XL is perfect for any family with its roomy 5 quart basket you can air fry a whole chicken. The dishwasher safe basket and grease separator with non-stick coating make cleaning a breeze just wipe it down with a damp soapy microfiber towel and toss it in the dishwasher.
The Uber Air Fryer XL features an easy to use touch display for temperature and time setting with temperatures ranging from 140F to 400F, at 140F it is great for dehydrating your favorite snacks and foods. the digital display also has several pre-set cooking temperatures and time to perfectly cook chicken, steak, fries, wings and so much more with a single press of a button. Every Uber Air Fryer XL Comes with a free recipe book so that you can explore tasty meals as soon as you get it with plenty more recipes on our site.
The Uber AirFryer XL’s plastic is prevented from the factory which eliminates any plastic smell or taste in your foods from the first use. This is one of the biggest complaints from air fryer users and at Uber Appliance we listen to our customer’s feedback and strive to provide the best experience from the first use!
]]>Take your avocado's and cut them long ways as shown in the picture below
Once you split the avocado's in half use a sharp kitchen knife to hit the avocado pit and twist it back and forth to get it loose and you should be able to easily pull it out.
Once the pits have been removed from the halves, peal the exterior skin of the avocado and cut it up into long way slices (as thick or as thin as you would like).
Alternative: You can make it Guacamole Toast if you like, just prep some guacamole in a molcajete with your favorite ingredients, avocado, diced up tomatoes and onions and spices to taste.
Take your two (or one) slices of protein toast and place in the basket on the crisper tray, set the air fryer to 400deg for 6 minutes, flip the toast at the 3 minute mark. You can increase the time for crispier toast if you like or you can reduce it if you like softer toast.
Once the toast is toasted, place on a plate and add the avocado slices on top, salt and lemon to taste and enjoy. We opted to go the Guacamole route and it tasted delicious, judge for your self:
We hope that you found this recipe delicious and useful, feel free to share with friends and family via email or social media. If you have a recipe you would like to share please let us know in the comments below we love to hear your feedback!
Look no further than the Uber Appliance line of Air Fryers, from the Air Fryer XL 5 Quart to its little brother the Air Fryer 3.7 Quart, the Uber Appliance Air Fryers are high quality built and long lasting.
our Uber Air Fryer XL is perfect for any family with its roomy 5 quart basket you can air fry a whole chicken. The dishwasher safe basket and grease separator with non-stick coating make cleaning a breeze just wipe it down with a damp soapy microfiber towel and toss it in the dishwasher.
The Uber Air Fryer XL features an easy to use touch display for temperature and time setting with temperatures ranging from 140F to 400F, at 140F it is great for dehydrating your favorite snacks and foods. the digital display also has several pre-set cooking temperatures and time to perfectly cook chicken, steak, fries, wings and so much more with a single press of a button. Every Uber Air Fryer XL Comes with a free recipe book so that you can explore tasty meals as soon as you get it with plenty more recipes on our site.
The Uber AirFryer XL’s plastic is prevented from the factory which eliminates any plastic smell or taste in your foods from the first use. This is one of the biggest complaints from air fryer users and at Uber Appliance we listen to our customer’s feedback and strive to provide the best experience from the first use!
]]>Skipping breakfast is a big mistake for us, no one ones to feel hunger pangs or worse having a growling stomach at the 6am meeting at work. With busy lives and being short on time its hard to make time for a decent healthy breakfast. As true as that may sound there are quick and easy breakfast options out there and one of the most popular is Starbuck's quick and easy to eat on the go egg bites. So delicious and fluffy with tasty bacon bits and chives, yummy and Keto Friendly. But at what Starbucks charges, no thank you we'd rather make our own fresh and hot out of the Uber Air Fryer!
With that said, here is our version of the Starbucks Egg Bites, quick and easy to make in the Uber Air fryer from the comfort of your own kitchen.
Pre-heat your Uber Appliance Air Fryer to 400deg for 5min, as your air fryer is heating start prepping your egg bites. We like to use a soufflé cup or silicone muffin mold. Coat the soufflé cup or muffin mold with a light coating of olive oil. Take the two eggs and whisk them until fully mixed up. Place your slice of bacon in the air fryer and let it cook for 5min. As your bacon is cooking add the chives, salt and pepper to your egg mix and whisk again until fully mixed.
Remove the bacon from the air fryer, let it cool for a minute or two before chopping it up into little bits. Once chopped up add it to the egg mixture and whisk till its fully mixed. Pour your egg mix into the soufflé cups or muffin molds and place in the air fryer.
Once your egg soufflé's are in the air fryer, set the air fryer to 7min at 400deg and let it fully cook the egg. If you like a slightly runny egg bite you can cook for 4 or 5 minutes instead of 7. Add the shredded cheddar to the cups in the last minute or two then let it melt. Once cooking is complete, remove the soufflé cups from the air fryer, let it cool for a few minutes, then enjoy it either in the cup or remove and take it with you on the go! you will even have time to make your morning coffee while the egg bites are cooking in the air fryer.
1- You can line up the uncooked bacon inside the soufflé cup to make it surrounding the egg bite to cut on the cooking time.
2- You can also switch up the ingredients and add what ever you like! you can add chopped up onions, tomatoes, spinach, or switch the bacon for sausage bits or you can even make a Mediterranean egg bite with crumbled feta. The options are only limited by your imagination!
We hope you enjoyed our copy cat Starbucks air fryer egg bites recipe, if you liked it please feel free to share it with friends and family either via email or on social media. If you have recipe ideas you would like us to include in this blog please send us a comment below, we love to hear from you and value your feedback!
Look no further than the Uber Appliance line of Air Fryers, from the Air Fryer XL 5 Quart to its little brother the Air Fryer 3.7 Quart, the Uber Appliance Air Fryers are high quality built and long lasting.
our Uber Air Fryer XL is perfect for any family with its roomy 5 quart basket you can air fry a whole chicken. The dishwasher safe basket and grease separator with non-stick coating make cleaning a breeze just wipe it down with a damp soapy microfiber towel and toss it in the dishwasher.
The Uber Air Fryer XL features an easy to use touch display for temperature and time setting with temperatures ranging from 140F to 400F, at 140F it is great for dehydrating your favorite snacks and foods. the digital display also has several pre-set cooking temperatures and time to perfectly cook chicken, steak, fries, wings and so much more with a single press of a button. Every Uber Air Fryer XL Comes with a free recipe book so that you can explore tasty meals as soon as you get it with plenty more recipes on our site.
The Uber AirFryer XL’s plastic is prevented from the factory which eliminates any plastic smell or taste in your foods from the first use. This is one of the biggest complaints from air fryer users and at Uber Appliance we listen to our customer’s feedback and strive to provide the best experience from the first use!
]]>Take your avocado's and cut them long ways as shown in the picture below
Once you split the avocado's in half use a sharp kitchen knife to hit the avocado pit and twist it back and forth to get it loose and you should be able to easily pull it out.
Once the pits have been removed from the halves, peal the exterior skin of the avocado and cut it up into long way slices (as thick or as thin as you would like) Wrap each slice with one piece of bacon.
Lightly coat the crisper tray in the Bottom of your Uber Air Fryer with a tea spoon of olive oil. We found that putting the oil on a paper towel and wiping the tray with the paper towel will allow an even coating.
Place the avocado wraps on the crisper tray in the basket and cook at 400deg for 7 minutes, at the 3 minute mark we suggest flipping the wraps over for even cooking and crispiness.
Once fully cooked remove, allow a few minutes for it to cool down and enjoy!
We hope that you found this recipe delicious and useful, feel free to share with friends and family via email or social media. If you have a recipe you would like to share please let us know in the comments below we love to hear your feedback!
Look no further than the Uber Appliance line of Air Fryers, from the Air Fryer XL 5 Quart to its little brother the Air Fryer 3.7 Quart, the Uber Appliance Air Fryers are high quality built and long lasting.
our Uber Air Fryer XL is perfect for any family with its roomy 5 quart basket you can air fry a whole chicken. The dishwasher safe basket and grease separator with non-stick coating make cleaning a breeze just wipe it down with a damp soapy microfiber towel and toss it in the dishwasher.
The Uber Air Fryer XL features an easy to use touch display for temperature and time setting with temperatures ranging from 140F to 400F, at 140F it is great for dehydrating your favorite snacks and foods. the digital display also has several pre-set cooking temperatures and time to perfectly cook chicken, steak, fries, wings and so much more with a single press of a button. Every Uber Air Fryer XL Comes with a free recipe book so that you can explore tasty meals as soon as you get it with plenty more recipes on our site.
The Uber AirFryer XL’s plastic is prevented from the factory which eliminates any plastic smell or taste in your foods from the first use. This is one of the biggest complaints from air fryer users and at Uber Appliance we listen to our customer’s feedback and strive to provide the best experience from the first use!
]]>If you take moisture out of food there is a much lower chance bacteria or mold will be able to grow and spoil the food. Most dehydrated meats are also seasoned, the spices and salt slow down the growth of food spoiling bacteria.
To dehydrate foods you can use the readily available dedicated Dehydrators, but you can also use an air fryer to achieve the same result. Most air fryers are more than capable of dehydrating food with the right settings, In fact most air fryers have a dehydrator setting built in.
Dehydrators in the simplest terms remove moisture from food. Basically dehydrators circulate air that has been slightly warmed up around food to slowly remove moisture with out actually cooking it. Adding salt and spices in the case of beef jerky draws out the water content to the surface of the food, allowing the warm air, which has low vapor content, to evaporate this excess water and absorb it. When the moisture is removed from the food it becomes dry and lasts much longer unrefrigerated.
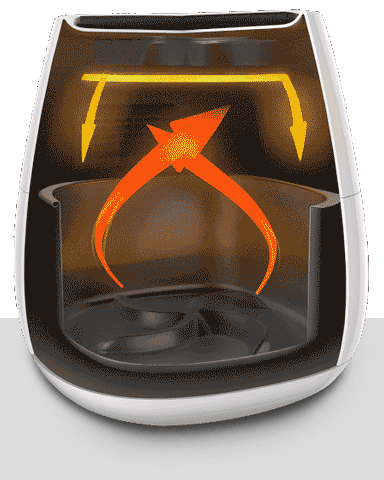
To answer that question one must understand how air fryers work. Air Fryers have a heating element much like the one on your stove top, the heating element brings the air fryer basket up to the desired cooking temperature. Behind the heating element is a fan that circulates the hot air around your food. At high temperatures up to 400 degrees this hot air acts like hot oil, the hot air circulates and surrounds your foods and frying them with out added grease or oil. At lower temperatures between 120 - 140 deg Fahrenheit it gently brings the moisture out of the food with out cooking it. That is the exact effect we are hoping to achieve with our air fryer when looking to dehydrate foods.
Turning up the heat will not help dehydrate foods faster, it will just end up causing the foods to be cooked rather than dehydrated. The dehydrating process is a slow extraction of water out of the foods you are dehydrating, so it requires lower heat at extended periods of time to slowly pull the moisture out of the food and releasing it into the air as water vapor. We recommend following the tempratures between 120-160F deg to achieve dehydration without cooking the food
There is plenty of foods you can dehydrate in an air fryer, from fruits, vegetables, to meats. Are you looking to make some raisins, you can do that with an air fryer, how about beef jerky, absolutely. Here is a short list of dehydrated foods you can make in an air fryer
Our favorite from this list is banana chips, they make healthy, naturally sweet snacks for us and our best furry friends. Healthy natural banana chips are a great and low cost dog treat that you know is nutritious, home made and good for your pup's health.
Most dehydrated foods tend to be snack items, banana chips, raisins, beef jerky etc. It is much healthier to reach for a dehydrated snack than it is to reach for a heavily processed snack like actual potato chips, or cookies or cakes. Snacking on dehydrated food is much healthier for you because all you are eating is the actual fruit, vegetable or meat no extra fat, grease or anything un-natural. The dehydrated foods still hold on to their nutrients, anti-oxidants and vitamins, removing the water content from the fruit or vegetable does not take away from its nutritional value at all. There have been many studies showcasing the health benefits of eating raw fruits and vegetables, in a sense dehydrated fruits and vegetables are still raw vegetables that have been dried out.
Dehydrated foods last a long period of time before going bad, on average dehydrated foods can last 6 to 12 months without spoiling and without the use of preservatives. If you want your dehydrated foods to last even longer, up to 4 years we recommend storing the dehydrated foods in a vacuum sealed bag. The vacuum sealed bags help keep air and moisture out of the food which will allow it to last for much longer after it has been dehydrated.
Dehydrated food when stored properly in vacuum sealed bags can be a great source of nutrition in case of an emergency, some people keep these vacuum sealed dehydrated food bags in their cars in-case they were stuck stranded for an extended period of time. It can be a life saver and a great survival planning hack.
Freeze drying is a technique of freezing food quickly then using heat and pressure to remove up to 90% of moisture from foods allowing them to last much longer periods of time in storage when compared to traditional dehydrating.
This technique is mostly used for emergency food storage for natural disasters and doomsday preparation. While Dehydrating foods will not allow them to last as long as freeze drying we find that it is a practical approach as with proper storage you can still have your dehydrated foods last up to 4 years if vacuum sealed after dehydrating.
Freeze Dried foods can last up to 10 or 15 years but require much more specialized and expensive equipment that maybe out of the reach of the average consumer and more suited to a large company. Some freeze drying equipment can cost from the low end of a few thousand dollars to multiple 5 figure sums. This makes it prohibitively expensive for the average person, mean while most air fryers can be had for roughly $90- $150 which is a big price difference.
yes, if you want to rehydrate your dehydrated foods after storing them for a period of time you can. You can rehydrate your dehydrated foods by placing them in a bowl of fresh water or milk, and allowing them to soak up the moisture for 10-20 minutes. This works really well for banana chips or dehydrated berries when soaking them in milk with cereal or if you want to rehydrate dates, apples, peas, carrots and other fruits and vegetables.
The process is pretty straight forward, start by prepping your food items, in the case of fruits or vegetables make sure you wash them and cut them in the desired shape. We recommend thin slices or small chunks as it will make it easier to dry slices or small chunks rather than trying to dry out big pieces.
For Meats and Venison, the same rule of thumb applies, the thinner the slices the better, just make sure they are not too thick or too small that it will be difficult to season and eat later on once dried. Remember dehydrated food shrinks in the process.
Once you have cut up your slices or chunks, the next step is to season it up, apple chips go well with a little bit of cinnamon, you can make a healthy alternative to potato chips with carrot chips seasoned with sea salt. We just apply the seasoning straight to the fruits and vegetables without any added oil or anything, and we do that so that it is easier for the foods to dry. For Beef Jerky, there are plenty of recipes out there, but we put one together that you will love here on our recipes blog.
After seasoning to your heart's content, carefully place the fruits and vegetables in the basket, make sure you keep the grease separator in place to allow air flow below and around the slices. When you place the slices leave a little bit of room between each slice to allow the air to flow completely around it, if you don't do this you might have partially dehydrated food which isn't a good thing. Good spacing and air flow is the key to properly dehydrated snacks.
PRO TIP: Use a stainless steel rack, or stackable stainless steel racks to increase the capacity of your air fryer basket when dehydrating. If you don't have stackable stainless racks, you can improvise using wood skewers, just pierce the meat or fruit chips through and let them hang, you can put multiple skewers and let them rest on the top of the basket, just be careful when re-inserting the basket in the air fryer not to drop the skewers.
Once you have placed all the food in your air fryer basket, set your Uber Air Fryer XL to 140 degrees Fahrenheit and 8 hours of cooking time. The dehydrating process takes a long time because it slowly removes moisture and the goal is not to quickly cook the foods but rather to let it release the moisture over time. Once you have set the temperature and time, place your basket and allow the air fryer to do its magic. Do not disturb the dehydrating process by removing the basket frequently, we recommend checking at around the 4 hour mark and 6 hour mark. You can remove earlier if you want a little bit of chewiness or you can let it keep dehydrating past 8 hours if you want extra crunchy snacks.
Look no further than the Uber Appliance line of Air Fryers, from the Air Fryer XL 5 Quart to its little brother the Air Fryer 3.7 Quart, the Uber Appliance Air Fryers are high quality built and long lasting.
our Uber Air Fryer XL is perfect for any family with its roomy 5 quart basket you can air fry a whole chicken. The dishwasher safe basket and grease separator with non-stick coating make cleaning a breeze just wipe it down with a damp soapy microfiber towel and toss it in the dishwasher.
The Uber Air Fryer XL features an easy to use touch display for temperature and time setting with temperatures ranging from 140F to 400F, at 140F it is great for dehydrating your favorite snacks and foods. the digital display also has several pre-set cooking temperatures and time to perfectly cook chicken, steak, fries, wings and so much more with a single press of a button. Every Uber Air Fryer XL Comes with a free recipe book so that you can explore tasty meals as soon as you get it with plenty more recipes on our site.
The Uber AirFryer XL’s plastic is prevented from the factory which eliminates any plastic smell or taste in your foods from the first use. This is one of the biggest complaints from air fryer users and at Uber Appliance we listen to our customer’s feedback and strive to provide the best experience from the first use!
Ingredients:
Rinse your chicken breast under Luke warm water and set aside. Crack the large egg in a bowl and whisk till fully mixed. Take the chicken breast and dip in the egg then coat lightly with all purpose flour. then coat with breading and set aside. Pre-heat your air fryer by setting to 370 deg for 5 min. If you like your chicken juicy on the inside and crispy on the outside we recommend spraying with a light coating of cooking oil prior to inserting in the air fryer basket. Place a round sheet of parchment paper on the bottom of the air fryer basket to prevent the chicken breast from sticking to the bottom. Place the breaded chicken breast on the parchment paper and cook at 370 deg for 12 min, we recommend removing the basket 3 times, or every 4 minutes and giving the basket a nice shake to keep the chicken breast cooking evenly.
We like to use wheat bread but you can use your favorite toast be it sour dough, sesame, or white bread. Place your toast in the toaster and toast to your liking. Once toasted remove the bread and put the Chipotle ranch on one piece of toast then top it with the cheddar cheese slice the heat from the bread will help melt the cheese just enough. on the other slice of toast place the Guacamole, top with basil leaves and finally the sun dried tomatoes (sliced in halves).
By the time you finish prepping the toast your chicken breast should have fully cooked. Use tongs to remove the fried chicken breast and slice it then place it on top of the cheese (to make it extra melty). Put it all together with a side of chips and your favorite beverage and voila a tasty and healthy lunch!
We hope you enjoyed this awesome recipe, if you think we could improve on it, or if you have a better recipe all together or any comments or questions feel free to leave us a message below in the comments and we will do our best to answer each and every comment.
Look no further than the Uber Appliance line of Air Fryers, from the Air Fryer XL 5 Quart to its little brother the Air Fryer 3.7 Quart, the Uber Appliance Air Fryers are high quality built and long lasting.
our Uber Air Fryer XL is perfect for any family with its roomy 5 quart basket you can air fry a whole chicken. The dishwasher safe basket and grease separator with non-stick coating make cleaning a breeze just wipe it down with a damp soapy microfiber towel and toss it in the dishwasher.
The Uber Air Fryer XL features an easy to use touch display for temperature and time setting with temperatures ranging from 140F to 400F, at 140F it is great for dehydrating your favorite snacks and foods. the digital display also has several pre-set cooking temperatures and time to perfectly cook chicken, steak, fries, wings and so much more with a single press of a button. Every Uber Air Fryer XL Comes with a free recipe book so that you can explore tasty meals as soon as you get it with plenty more recipes on our site.
The Uber AirFryer XL’s plastic is prevented from the factory which eliminates any plastic smell or taste in your foods from the first use. This is one of the biggest complaints from air fryer users and at Uber Appliance we listen to our customer’s feedback and strive to provide the best experience from the first use!
]]>Normally a seafood boil requires lots of prep, large dishes, and a big clean up for a messy meal. At Uber Appliance we spent time doing research to see if we can cook up a seafood boil in an air fryer and luckily we found an awesome quick prep, mess free recipe and want to share it with you.
Start by taking your Red skin potatoes and rinse them under the sink to clean them before cooking. Place the red skin potatoes in microwave safe dish. Place the potatoes in your microwave and set it to 5 min. After it completes cooking remove the dish from the microwave and let it cool for 5 min. Once cooled split each potato in half. Split the potatoes between two aluminum foil bags. The reason we cook the potatoes in the microwave before continuing to cook it with the rest of the ingredients in the Air fryer is the potatoes take a longer time to cook and we don't want to over cook the shrimp after we mix it all together.
Just as you did with the potatoes, rinse the corn and raw shrimp. Take your corn ears and split them in half, put the two half corn ears in each Aluminum bag. Add the devined shrimp to the aluminum bags as well. Cut up the Anadojulie sausuage up in slices then add to the mix. Once all the main ingredients are in the aluminum foil bags, add 1 tbs of virgin olive oil and shake the bags to get everything coated in oil. Open the bags up and add 2 tbs of butter, Oldbay seasoning and salt to your taste. Shake the bag once more then cut up a lemon in quarters for each bag and place the lemon quarters in the bag.
Pre-heat your Air fryer by setting the temperature to 400 deg for 5 min. After pre-heating, Place your fully prepped bags in the air fryer basket. Make sure the basket grease separator has been removed to maximize basket capacity. Set the Air Fryer temperature to 320 degrees for 15min. Remove and shake the basket every 5 min to insure the butter, seasoning, salt, and lime juice is coating the contents of the bag. Once cooking is complete remove from the air fryer basket and serve with a lemon on the side.
We hope you enjoyed this awesome recipe, if you think we could improve on it, or if you have a better recipe all together or any comments or questions feel free to leave us a message below in the comments and we will do our best to answer each and every comment.
Look no further than the Uber Appliance line of Air Fryers, from the Air Fryer XL 5 Quart to its little brother the Air Fryer 3.7 Quart, the Uber Appliance Air Fryers are high quality built and long lasting.
our Uber Air Fryer XL is perfect for any family with its roomy 5 quart basket you can air fry a whole chicken. The dishwasher safe basket and grease separator with non-stick coating make cleaning a breeze just wipe it down with a damp soapy microfiber towel and toss it in the dishwasher.
The Uber Air Fryer XL features an easy to use touch display for temperature and time setting with temperatures ranging from 140F to 400F, at 140F it is great for dehydrating your favorite snacks and foods. the digital display also has several pre-set cooking temperatures and time to perfectly cook chicken, steak, fries, wings and so much more with a single press of a button. Every Uber Air Fryer XL Comes with a free recipe book so that you can explore tasty meals as soon as you get it with plenty more recipes on our site.
The Uber AirFryer XL’s plastic is prevented from the factory which eliminates any plastic smell or taste in your foods from the first use. This is one of the biggest complaints from air fryer users and at Uber Appliance we listen to our customer’s feedback and strive to provide the best experience from the first use!
]]>First step is to prep the String Cheese with base breading, Crack the egg in a bowl and beat it with a fork till its fully mixed. Take each cheese stick and coat it fully with the egg then coat with a light coat of all purpose flour. Next take your base breaded cheese stick and coat it with the crushed Hot Cheetos. Re-coat your cheese stick with egg and dip it back in the crushed Hot Cheetos. Repeat the steps above with the rest of the cheese sticks. Once all 4 cheese sticks have been coated you are ready to put them in the air fryer.
Add some parchment paper to the base of your air fryer basket to prevent the Hot Cheetos Mozzarella sticks from sticking to the bottom of the basket. Pre-heat your air fryer to 370 deg for 5 min prior to adding the Mozzarella sticks. Insert the Mozzarella sticks in the basket and cook for 4 min or until the Hot Cheetos Mozzarella sticks are soft on the inside and crispy on the outside.
Spicy Mozzarella Air Fryer Sticks are made with hot cheese puffs. (Harper Point Photography)
Voila, look how delicious these look. This is making us hungry, we are headed back to the kitchen to cook up another batch, haha. Do you have a recipe request? Did you find a twist that would make this recipe better? Any comments and questions just leave us a little blurb below in the comments and we will do our best to answer it!
Look no further than the Uber Appliance line of Air Fryers, from the Air Fryer XL 5 Quart to its little brother the Air Fryer 3.7 Quart, the Uber Appliance Air Fryers are high quality built and long lasting.
our Uber Air Fryer XL is perfect for any family with its roomy 5 quart basket you can air fry a whole chicken. The dishwasher safe basket and grease separator with non-stick coating make cleaning a breeze just wipe it down with a damp soapy microfiber towel and toss it in the dishwasher.
The Uber Air Fryer XL features an easy to use touch display for temperature and time setting with temperatures ranging from 140F to 400F, at 140F it is great for dehydrating your favorite snacks and foods. the digital display also has several pre-set cooking temperatures and time to perfectly cook chicken, steak, fries, wings and so much more with a single press of a button. Every Uber Air Fryer XL Comes with a free recipe book so that you can explore tasty meals as soon as you get it with plenty more recipes on our site.
The Uber AirFryer XL’s plastic is prevented from the factory which eliminates any plastic smell or taste in your foods from the first use. This is one of the biggest complaints from air fryer users and at Uber Appliance we listen to our customer’s feedback and strive to provide the best experience from the first use!
]]>
We base our copycat Chic-Fil-A spicy chicken sandwich meal with Aldi ingredients, we start with the infamous Red Bag Chicken filets, or as they are formally called the Kirkwood Chicken Breast Filets. We also picked up a bag of Season’s Choice Waffle Fries as well as a 6 pack of Specially Selected’s Brioche Buns. For the spicy sauce we used Sweet Baby Ray’s Buffalo Wing Sauce and finally for cheese we decided to go with Cabot’s Seriously Sharp Cheddar white Cheddar cheese. We opted out of the pickles but if you like you can add any dill pickle sliced thin to the bottom of the sandwich.
We place one chicken filet and 1/3rdof the small bag of waffle fries in the air fryer basket. We Set our Uber Air Fryer XL to the chicken setting at 25min with 400F. We let the air fryer pre-heat for 5 of those 25 mins. Once preheated we add the items to the basket and let it cook for 10 min before removing the basket to flip over the chicken filet and shake the fries around for even cooking. When we put the basket back in we let the air fryer do its thing while toasting the Brioche Bun in the toaster at 3min and 350F. Once everything is ready we put our chicken filet on our brioche bun, add a two slices of cheddar and a little buffalo wing sauce. Et Voila, a tasty chic filet meal at home.
Compared to Chic-Fil-A's price, Aldi definitely comes out on top, our waffle fries cost $1.49 (50 cents per serving) , the 6 brioche buns cost $3.65 (61 cents per serving), Chicken filets at $5.99 for 5 pieces ($1.20 per serving). The cheese and sauce we estimate at 35 cents per serving and finally a tasty beverage, our choice was a can of Diet Dr pepper 50 cents each, for a grand total of just over $3, $3.16 to be exact way cheaper than any meal we can buy at chic filet and it was homemade!
As far as the taste is it exactly like Chic-Fil-A? Of course not but it comes pretty darn close, the convenience of being able to cook it at home on any day and at any time at a steep discount makes it pretty awesome though. We highly recommend you give a shot at home and see if your family enjoys it as much as we did! It was fun trying it out and it was pretty delicious in our opinion.
Did you like this recipe? do you think we can do better? let us know in the comments below we love to hear from our readers!
Look no further than the Uber Appliance line of Air Fryers, from the Air Fryer XL 5 Quart to its little brother the Air Fryer 3.7 Quart, the Uber Appliance Air Fryers are high quality built and long lasting.
our Uber Air Fryer XL is perfect for any family with its roomy 5 quart basket you can air fry a whole chicken. The dishwasher safe basket and grease separator with non-stick coating make cleaning a breeze just wipe it down with a damp soapy microfiber towel and toss it in the dishwasher.
The Uber Air Fryer XL features an easy to use touch display for temperature and time setting with temperatures ranging from 140F to 400F, at 140F it is great for dehydrating your favorite snacks and foods. the digital display also has several pre-set cooking temperatures and time to perfectly cook chicken, steak, fries, wings and so much more with a single press of a button. Every Uber Air Fryer XL Comes with a free recipe book so that you can explore tasty meals as soon as you get it with plenty more recipes on our site.
The Uber AirFryer XL’s plastic is prevented from the factory which eliminates any plastic smell or taste in your foods from the first use. This is one of the biggest complaints from air fryer users and at Uber Appliance we listen to our customer’s feedback and strive to provide the best experience from the first use!
]]>
Step 1 – Thaw your frozen fries (30min)
If you are starting with a store bought bag of frozen fries we recommend you take some time to allow them to thaw out before trying to air fry them. The thawing process is critical to bringing the fries to room temperature before air frying that way it takes less time to cook them. We suggest allowing the frozen fries to sit at room temperature for 30min prior to cooking, that should be enough time to thaw them out.
Step 2- Pre-heat your air fryer (400F for 10min)
Next step is pre-heating your air fryer before inserting the fries, set your air fryer to 400F and allow it to pre-heat for 10min, you want the air fryer already hot before putting your fries in. Once the air fryer is adequately pre-heated remove the basket and add a tea spoon of cooking oil or olive oil to the basket so that the fries don’t stick to it. Don’t add too much oil as that defeats the purpose of using an air fryer, just add a little to keep fries from sticking to the basket/pan. We advise against using a spray on type cooking oil as it can cause the non-stick coating to flake off.
Step 3 – Set temperature and time (400F for 20min) for your Air Fryer and place fries in cooking basket
Afterwards go ahead and add your thawed fries to the basket and insert it into the air fryer, set the temperature to 400F and 20min cook time. Once set, check on your fries every. 6 to 7 min, remove the basket and give it a nice shake so that the fries are re-distributed and cook evenly. You should only do the shake process 3 times during the 20min. After 20min, remove the fries and serve with your favorite condiments, most store bought frozen fries are already pre-seasoned but you can make it your own with extra pepper, or a little paprika for an extra kick.
Step 1 – Wash and Cut your potatoes
If you want to make homemade fries from scratch, get a few Idaho potatoes and rinse them thoroughly prior to cutting to get rid of any dirt, fertilizer and other contaminants. You can leave the skin on if you like or you can peal it then start cutting them length wise into fingers. Once you cut the amount you plan on eating, put it in a strainer and wash away any excess starch.
Step 2 – Season your potatoes
Place your fries in a bowl and coat with a teaspoon of cooking oil or olive oil. Season to taste, we like ours with salt, pepper, and paprika, there is also plenty of store spice mix’s so that you can experiment with, find what you like and try them out. You can let the fries sit for a short period of time to allow the spices to be absorbed or you can fry them immediately after seasoning. We don’t recommend you let the seasoned fries to sit for longer than 5 to 10min before cooking as people tend to over season and you want the spices to flake off during cooking plus the seasoning adds a nice texture to the crispy fries.
Step 3 – Pre-heat your air fryer (400F for 10min) and Air Fry your Fries (400F for 25-30min)
As you are seasoning your fries you can pre-heat your air fryer to 400F for 10min. Once pre-heated put your fries in the basket and cook for 25-30min depending on how thick the fries are cut. We recommend removing and shaking the basket with the fries every 7-10min to get that ultimate crispiness.
Uber Appliance offers one of the best air fryers on the market today, our Uber Air Fryer XL is perfect for any family with its roomy 5 quart basket you can air fry a whole chicken. The dishwasher safe basket and grease separator with non stick coating make cleaning a breeze just wipe it down with a damp soapy microfiber towel and toss it in the dish washer.
The Uber Air Fryer XL features an easy to use touch display for temperature and time setting with temperatures ranging from 150F to 400F, the digital display also has several pre-set cooking temperature and time to perfectly cook chicken, steak, fries, wings and so much more with a single press of a button. Every Uber Air Fryer XL Comes with a free recipe book so that you can explore tasty meals as soon as you get it with plenty more recipe’s on our site.
The Uber Air Fryer XL’s plastic is pre-vented from the factory which eliminates any plastic smell or taste in your foods from the first use. This is one of the biggest complaint from air fryer users and at Uber Appliance we listen to our customer’s feedback and strive to provide the best experience from the first use!
Last but not least buy from Uber Appliance with confidence, we guarantee the quality of our air fryers with our “love it or leave it” 30 day free returns and free exchanges warranty. Our Uber Air Fryer comes standard with a 1 year warranty against any manufacturers defects and we offer extended warranties for up to 2 years. We have been in business for the last 5 years and we have a reputation to protect which is why we place our customers first, our friendly Customer Service Rep Jennifer is available via email 24/7 to answer any questions you might have!
]]>Doing the Keto diet is hard but it doesn't have to be if you have an Uber Air Fryer (if you don't get yours here: Uber Air Fryers) Today we are taking a low carb favorite vegetable Cauliflower and making it into a delicious entree or appetizer to share (depends how hungry you are 😂) This simple, quick yet delicious recipe is bound to be in your top 10 once you try it, so lets get to it.
Here's what you need:
Start by pre-heating your Uber Air Fryer to 400 degrees while you prep. Take your Cauliflower head and remove the leaves then chop the bottom to sit flat in the Uber Air Fryer Basket. Mix the salt and pepper in the olive oil and coat the exterior of the Cauliflower. Once prep is done place the Cauliflower head in the Air Fryer basket and set it to 400 degrees for 40min. at the 20min mark, remove the basket and shake it for even cooking. at the 35min mark remove the basket and sprinkle the parmesan cheese on top of the cauliflower and put it back in the air fryer to complete cooking. Once complete, remove, add the Balsamic Glaze and Fresh Thyme and serve!
Look no further than the Uber Appliance line of Air Fryers, from the Air Fryer XL 5 Quart to its little brother the Air Fryer 3.7 Quart, the Uber Appliance Air Fryers are high quality built and long lasting.
our Uber Air Fryer XL is perfect for any family with its roomy 5 quart basket you can air fry a whole chicken. The dishwasher safe basket and grease separator with non-stick coating make cleaning a breeze just wipe it down with a damp soapy microfiber towel and toss it in the dishwasher.
The Uber Air Fryer XL features an easy to use touch display for temperature and time setting with temperatures ranging from 140F to 400F, at 140F it is great for dehydrating your favorite snacks and foods. the digital display also has several pre-set cooking temperatures and time to perfectly cook chicken, steak, fries, wings and so much more with a single press of a button. Every Uber Air Fryer XL Comes with a free recipe book so that you can explore tasty meals as soon as you get it with plenty more recipes on our site.
The Uber AirFryer XL’s plastic is prevented from the factory which eliminates any plastic smell or taste in your foods from the first use. This is one of the biggest complaints from air fryer users and at Uber Appliance we listen to our customer’s feedback and strive to provide the best experience from the first use!
]]>Thaw out your cut up frozen cantaloupe chunks and place them into the sorbet maker chute. You can add a little bit of greek yogurt for a soft serve consistency or add sugar/honey to taste (not Keto Friendly). Push down the fruit down the feed tube and serve! You can add coconut (also Keto Friendly) or Stevia instead of sugar or honey to add a bit more sweetness.
Like the Nutritional facts on this recipe? wondering how you can generate your own so that you can track your macros like a champ. We got ours generated at Happyforks.com they have an awesome tool where you can plug in the ingredients for any recipe and it will generate a nutritional facts label like the one you see above. You can also do the same using the fitness pal app, its a great way to track your calories and macros if you are going on a strict Keto diet.
Did you like this recipe, do you have a better recipe or a twist on this recipe? let us know in the comments we love to hear back from our readers!
]]>Fear not Uber Appliance is here to satisfy your sweet tooth with a keto friendly recipe that will help you achieve your sexy beach bod! Check out this awesome Keto Friendly Mouth Watering Watermelon Keto ice Cream recipe that we carefully crafted in our Uber Sorbet Ice Cream Maker, home made, delicious, organic and keto friendly!!
Thaw out your cut up frozen Watermelon chunks and place them into the sorbet maker chute. Push down the fruit down the feed tube, you can add greek yogurt for soft serve consistency and serve! You can add coconut (Keto Friendly) and Stevia to add flavor!
]]>
Who doesn't love a nice juicy medium rare Ribeye steak? yep thats what I thought, my mouth is watering just thinking about it 😛. Today we have a treat for you with our Uber Air Fryer (get yours here today: Uber Air Fryers) cooking up a nice juicy medium rare Ribeye Steak with some crunchy asparagus! Wasting no more time here's what you need:
Step one involves seasoning your steak then allowing the air fryer to preheat while you wait for your steaks to lightly marinate. We start off by putting our steaks on a clean surface, adding a light coating of olive oil, this will allow the seasoning to stick to the steak and gives the steak a nice sear while cooking in the air fryer. Once you added a light coating of oil using a coarse grinder on the largest setting grind a little bit of coarse sea salt and fresh black pepper on both sides of the steak. Be generous with the seasoning as you will lose 30% of the salt during the cooking process and if your steak is 3/4-1 inch thick it will need the seasoning to taste good.
Once you are done seasoning the steak, set it aside and let it absorb the salt and pepper while you pre-heat your air fryer. We like to pre-heat our air fryer by setting the temperature to 400F deg and allowing it to run empty for 5 minutes. This gives enough time for the air fryer to reach cooking temperature and allows the basket it to be nice and hot when its time to place the steaks inside. We recommend you leave the crisper tray in to allow the air to flow all around the steak while cooking and its a great way to allow the grease from the steak to drip to the bottom of the basket so that your steaks are not greasy.
While the Air fryer is heating up and your steaks are marinating this is the perfect time to get your asparagus prepped and seasoned. Wash your asparagus with water to make sure it is clean prior to seasoning. Once the asparagus is clean we lightly coat it with olive oil and season it the same way we did the steaks, with coarse sea salt and fresh black pepper.
Carefully remove the basket from the air fryer and make sure to use tongs to place your seasoned ribeye and seasoned asparagus in the basket. Make sure the basket has the crisper tray in the bottom to ensure air flow all around the food while it cooks. We recommend using tongs to prevent yourself from burning your fingers as the air fryer basket will be hot after pre-heating.
Place the air fryer basket back into the body of the air fryer and set the cooking temperature to 400F for 15minutes. Allow the food to cook and at the 5 minute mark we recommend removing the air fryer basket to flip your steak and to shake up the asparagus. At the 10 minute mark you can add butter, garlic cloves and rosemary directly on to the steak, this will give the steak that nice buttery, garlicky, and rosemary flavor kick that we know and love.
At the 12 mintute mark, flip the steak again and make sure the garlic cloves and rosemary are sitting on top again, this is to get the flavor in both sides. at the 12minute mark you can remove the asparagus if you want it a little crunchy, you can shake it up and leave it to cook for the full 15 minutes if you want softer asparagus.
Once the cooking time is up and you hear the chime, its time to remove the steak and asparagus from the air fryer basket. Plate up your food and enjoy with your favorite beverage, we recommend a nice red wine with steak or an IPA beer as it will enhance the dining experience. At this point you can also add a compound butter to your steak if you like it extra buttery, or you can add a dinner roll as a nice dose of carbs (if you are not following Keto). Bon Appetite!
Look no further than the Uber Appliance line of Air Fryers, from the Air Fryer XL 5 Quart to its little brother the Air Fryer 3.7 Quart, the Uber Appliance Air Fryers are high quality built and long lasting.
our Uber Air Fryer XL is perfect for any family with its roomy 5 quart basket you can air fry a whole chicken. The dishwasher safe basket and grease separator with non-stick coating make cleaning a breeze just wipe it down with a damp soapy microfiber towel and toss it in the dishwasher.
The Uber Air Fryer XL features an easy to use touch display for temperature and time setting with temperatures ranging from 140F to 400F, at 140F it is great for dehydrating your favorite snacks and foods. the digital display also has several pre-set cooking temperatures and time to perfectly cook chicken, steak, fries, wings and so much more with a single press of a button. Every Uber Air Fryer XL Comes with a free recipe book so that you can explore tasty meals as soon as you get it with plenty more recipes on our site.
The Uber AirFryer XL’s plastic is prevented from the factory which eliminates any plastic smell or taste in your foods from the first use. This is one of the biggest complaints from air fryer users and at Uber Appliance we listen to our customer’s feedback and strive to provide the best experience from the first use!
]]>Personally I don't trust anyone that says they don't like Chicken wings, but hey thats just me. Chicken Wings is a classic American favorite, unfortunately store bought wings are usually un-healthy, greasy due to being cooked in a deep fryer but today at Uber Appliance we help you get your snack on the healthy way with the Oil Free Uber Appliance Air Fryer (get yours here if you don't have one: Uber Appliance Air Fryers)
Today's Chicken Wing Recipe is Keto Friendly, requires no oil or added grease. Chicken is a great source of protein for Adults and children a like, this recipe allows you to get your protein intake in a delicious format, lets get to it!
Here is what you need:
We start off this recipe by seasoning our thawed wings, allowing them to marinate then pre-heating our air fryer to make sure its nice and hot ready to air fry our delicious crispy wings.
Take your thawed chicken wings and coat them with olive oil. The olive oil will help the seasoning and spices to stick to the wings and be absorbed by the meat as it marinates. We season our wings with a little bit of salt and fresh ground pepper, you can add any dry rub spices such as cajun, lemon pepper, or any spices like paprika or crushed peppers as well. Really the seasoning portion is up to your taste and what you would like to flavor your wings with.
Once you have seasoned your wings, set them aside and let them marinate while you pre-heat your air fryer. We like to preheat our air fryer by setting the temperature to 400F deg and allowing it to run empty for about 5 minutes.
The next step is to air fry your chicken wings, remove the pre-heated air fryer basket and make sure the crisper tray is at the bottom of the basket. The crisper tray will allow the air to flow uniformly around the chicken wings to achieve maximum crispiness and it also works as a grease separator allowing any grease that drips from the wings to settle at the bottom and not mixed in your crispy wings. If you dont use the crisper tray your wings may not be as crispy as you want them and may have additional grease, we are not big fans of that so we use the crisper tray always.
Place your chicken wings in your air fryer basket, we recommend using tongs to do this to prevent burning your hands or fingers on the pre-heated air fryer basket. Make sure to leave roughly 3/8 to 1/2 in space between your chicken wings to allow air to flow around each wing and to allow even cooking and maximum crispiness.
Set your air fryer to 350F deg for 30min, at the 10 minute mark we recommend removing your air fryer basket and flipping your wings to the opposite side to make sure they evenly cook. at the 20 minute mark you can repeat the flipping exercise again to make sure everything is evenly cooked. at the 25minute mark your wings should be pretty crispy, if you would like to add a brushing of your favorite wing sauce now would be the time to do it. When you place your wings back in with the wing sauce, the wing sauce will lightly bake on to your crispy wings. If you prefer to keep the sauce till the end and have extra crispy wings, then let the wings cook the full 30 minutes before adding any sauce.
Once your wings have cooked fully and you hear the air fryer chime off indicating the cooking time has been reached, carefully remove your crispy chicken wings from the air fryer using tongs to prevent burns.
At this point you can enjoy your no breading air fryer chicken wings as is with just the dry seasoning or you can sauce it up with your favorite wing sauce and serve. If you want to add sauce, we advise you take your wings and place them in a sauce pan, add a little bit of your favorite wing sauce and give it a nice toss to evenly coat all the wings. Once your wings have been coated, place on a serving dish, allow a few minutes for it to cool down before enjoying.
Look no further than the Uber Appliance line of Air Fryers, from the Air Fryer XL 5 Quart to its little brother the Air Fryer 3.7 Quart, the Uber Appliance Air Fryers are high quality built and long lasting.
our Uber Air Fryer XL is perfect for any family with its roomy 5 quart basket you can air fry a whole chicken. The dishwasher safe basket and grease separator with non-stick coating make cleaning a breeze just wipe it down with a damp soapy microfiber towel and toss it in the dishwasher.
The Uber Air Fryer XL features an easy to use touch display for temperature and time setting with temperatures ranging from 140F to 400F, at 140F it is great for dehydrating your favorite snacks and foods. the digital display also has several pre-set cooking temperatures and time to perfectly cook chicken, steak, fries, wings and so much more with a single press of a button. Every Uber Air Fryer XL Comes with a free recipe book so that you can explore tasty meals as soon as you get it with plenty more recipes on our site.
The Uber AirFryer XL’s plastic is prevented from the factory which eliminates any plastic smell or taste in your foods from the first use. This is one of the biggest complaints from air fryer users and at Uber Appliance we listen to our customer’s feedback and strive to provide the best experience from the first use!
]]>The Recipe for Berry sorbet is super simple and delicious if you are using your Uber Sorbet Ice Cream Maker (if you don't have one, get yours here: Uber Sorbet Ice Cream Maker). Berries are a great anti-oxidant, Keto Friendly and are a super food. These awesome fruits are super delicious when served in a sorbet and will curb your cravings for ice cream if you are following a healthy Keto diet! Here is what you need:
Let your frozen berries thaw and cut them into medium size chunks, place them into the Sorbet Maker Chute and push down with the feed tube. You can add a little bit of greek yogurt for a soft serve consistency or add sugar/honey to taste (not Keto Friendly). Serve with thawed berries on top for garnish!
If you want, you can substitute one of the apples for an orange for a little extra sweetness. Another little tid-bit for a minty finish add a couple of mint leaves and stalks. The order in which you juice them doesn’t matter, I usually start with an apple then add greens, another apple, more greens etc. This method of juicing allows the juice to be more evenly distributed and gives you a good distribution of all the flavors rather than having a concentration at the top or bottom of one item vs the other. You could also stir the final product once its juice to make sure there is no separation after juicing. If you use our Uber Appliance Uber Juicer you will end up with a crisp clean almost pulp/skin free juice with very little foam/froth. The total number of calories in this green juice should be about 200 calories if you follow the recipe.
]]>A couple of tips, you want to prep the pineapple, most juicers will not be able to process pineapple skin. Cut the pineapple into small chunks that are skin free. Wash your strawberries well and cut them in half prior to juicing them.
I would alternate between adding chunks of pineapple and strawberry in the juicer. I would also add a couple of leaves every now and then for a well distributed juice mix. Once your fruits have been juiced place the finished juice in the fridge for a couple of hours as this drink is best served chilled.
If you are shooting to impress someone with your top notch juicing skills, then juice both the pineapple and the strawberries in separate containers. Pour the pineapple base first into a chilled mason jar, fill the jar about 2/3rds of the way up then add the strawberry juice. Top it off with tiny chunks of strawberries and crushed ice. The color contrast between the juices gives a very nice aesthetic to the drink and the crushed ice mixed with small strawberry chunks just enhances the coolness and flavor of the drink.
Pro Tip:
If you are looking for the best fast juicer on the market today check out our very own Uber Appliance Uber Juicer
]]>